Product Description
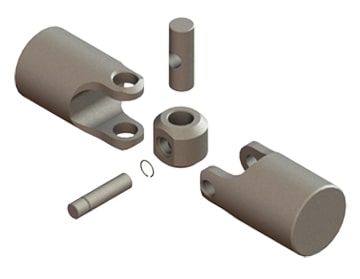
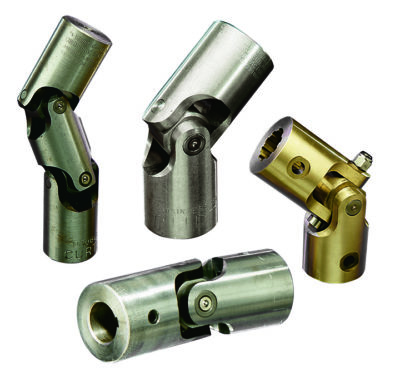
CAT universal joint
Length: 140.45 mm
Outer diameter: 42.88 mm
Features:
1) Material: 20CR/20CRMNTI/8620H
2) MOQ:500PCS
3) Can be designed and developed according to customers’ drawings or samples
Inner packing:
Packed with plastic sacks and paper boxes
Outer packing:
Packed with paper cartons and wooden pallets
| U-JOINT WITH 4 CHINAMFG BEARINGS | |||||||||
| FIG | Part No. | C | L | Series | BEARING TYPE | Interchange No. | |||
| (PRECISION) | SPICER | GKN | ALLOY | CAT NO. | |||||
| G | 951 | 33.34 | 79.37 | 2C | 4LWT | 5-2002X | HS520 | 1250 | |
| G | 994 | 33.34 | 79.37 | 4LWD | HS521 | 316117 | |||
| G | 952 | 33.34 | 79.37 | 2LWT,2LWD | 5-2116X | HS522 | 1063 | 6S6902 | |
| G | 536 | 36.5 | 90.4 | 3C | 4LWT | 5-3000X | HS530 | 1711 | 5D9153 |
| G | 535 | 36.5 | 90.4 | 2LWT,2LWD | 5-3014X | HS532 | 9K1976 | ||
| G | 966 | 36.5 | 90.4 | 2LWT,2HWD | HS533 | ||||
| G | 540 | 36.5 | 108 | 4C | 4LWT | 5-4002X | HS540 | 1703 | 6F7160 |
| G | 969 | 36.5 | 108 | 4HWD | 5-4143X | HS545 | 1689 | 6K 0571 | |
| G | 541 | 36.5 | 108 | 2LWT,2LWD | 5-4123X | HS542 | 1704 | 6H1262 | |
| G | 929 | 36.5 | 108 | 2LWT,2HWD | 5-4140X | HS543 | J4130 | 5M0800 | |
| G | 550 | 42.88 | 115.06 | 5C | 4LWT | 5-5000X | HS550 | 1720 | 7J5251 |
| G | 968 | 42.88 | 115.06 | 4HWD | 5-5177X | HS555 | 1728 | 2K3631 | |
| G | 552 | 42.88 | 115.06 | 2LWT,2LWD | 5-5121X | HS552 | 1721 | 7J5245 | |
| G | 933 | 42.88 | 115.06 | 2LWT,2HWD | 5-5173X | HS553 | 1722 | ||
| G | 486 | 49.22 | 130 | 4HWD | |||||
| G | 896 | 49.22 | 134.8 | 2LWT,2HWD | 5-5802X | 1877 | 9C 0571 | ||
| G | 560 | 42.88 | 140.45 | 6C | 4LWT | 5-6000X | HS560 | 1820 | |
| G | 905 | 42.88 | 140.45 | 4HWD | 5-6106X | HS565 | 1826 | 1S9670 | |
| G | 563 | 42.88 | 140.45 | 2LWT,2HWD | 5-6102X | HS563 | 1822 | ||
| G | 493 | 42.88 | 140.45 | 6C X 7C | 2LWT,2LWT | 5-6108X | 1828 | ||
| G | 49.22 | 148.4 | |||||||
| G | 569 | 42.88 | 140.45 | 2LWT,2HWD | 5-6109X | 1829 | |||
| G | 49.22 | 148.4 | |||||||
| G | 568 | 42.88 | 140.45 | 2LWD,2LWT | |||||
| G | 49.22 | 148.4 | |||||||
| G | 570 | 49.22 | 148.4 | 7C | 4LWT | 5-7000X | HS570 | 1841 | 8F7719 |
| G | 927 | 49.22 | 148.4 | 4HWD | 5-7105X | HS575 | 1840 | 2H 0571 | |
| G | 581 | 49.22 | 206.31 | 8C | 4LWT | 5-8200X | HS580 | 1851 | XX7146 |
| G | 584 | 49.22 | 206.31 | 4LWD | 5-8203X | HS581 | 1854 | ||
| G | 928 | 49.22 | 206.31 | 4HWD | 5-8105X | HS585 | 1850 | 6H2579 | |
| G | 582 | 49.22 | 206.31 | 2LWT, 2LWD | 5-8201X | HS582 | 1852 | ||
| G | 783 | 49.22 | 206.31 | 2DWT, 2HWD | 5-8202X | HS583 | 1853 | ||
| G | 785 | 71.4 | 165 | 8.5C | 4LWT | 5-8500X | HS680 | 7K0442 | |
| G | 963 | 71.4 | 165 | 4HWD | 5-8516X | HS685 | 2V7153 | ||
| G | 950 | 71.4 | 165 | 2LWT, 2HWD | HS683 | ||||
| G | 793 | 71.4 | 209.51 | 9C | 4DWT | 5-9000X | HS590 | 1864 | 9H9491 |
| G | 911 | 71.4 | 209.51 | 4HWD | 5-9016X | HS595 | 1868 | 9V7710 | |
| G | 792 | 71.4 | 209.51 | 2LWT, 2HWD | 5-9002X | HS593 | 1865 | ||
| G | GUIS67 | 56 | 174 | 4LWD | |||||
/* March 10, 2571 17:59:20 */!function(){function s(e,r){var a,o={};try{e&&e.split(“,”).forEach(function(e,t){e&&(a=e.match(/(.*?):(.*)$/))&&1
| Warranty: | 2year or 50000km |
|---|---|
| Color: | Natural Color |
| Certification: | IATF16949:2016 |
| Structure: | Single |
| Material: | 20cr/20crmnti |
| Transport Package: | Colour Box+Carton Box+Wooden Box |
| Samples: |
US$ 15/Piece
1 Piece(Min.Order) | |
|---|
| Customization: |
Available
| Customized Request |
|---|

How do you prevent premature wear in a universal joint?
Preventing premature wear in a universal joint is crucial for maintaining its performance, longevity, and reliability. Here’s a detailed explanation:
Several measures can be taken to prevent premature wear in a universal joint:
- Proper Lubrication: Adequate lubrication is essential for reducing friction, dissipating heat, and preventing premature wear in a universal joint. Regularly lubricating the joint with the recommended lubricant, such as grease or oil, helps to create a protective film between the moving parts, minimizing frictional losses and preventing metal-to-metal contact.
- Correct Alignment: Misalignment is a common cause of premature wear in a universal joint. Ensuring proper alignment between the shafts connected by the joint is crucial to distribute the load evenly and prevent excessive stress on the joint’s components. Misalignment can be minimized by using precision alignment techniques and checking the operating angles specified by the manufacturer.
- Appropriate Operating Angles: Universal joints have specified operating angles within which they can operate optimally. Operating the joint beyond these recommended angles can lead to increased wear and reduced lifespan. It is important to adhere to the manufacturer’s guidelines regarding the maximum allowable operating angles to prevent premature wear.
- Regular Maintenance: Implementing a regular maintenance schedule can help identify and address potential issues before they escalate into significant problems. Routine inspections of the universal joint, including checking for signs of wear, corrosion, or damage, can help detect any issues early on and allow for timely repairs or replacements.
- Proper Torque Capacity: Selecting a universal joint with an appropriate torque capacity for the specific application is essential for preventing premature wear. If the joint is subjected to torque levels exceeding its capacity, it can lead to excessive stress, deformation, and wear on the components. Ensuring that the selected joint can handle the expected loads and operating conditions is crucial.
- Quality Components: Using high-quality universal joint components, such as yokes, cross bearings, and needle bearings, can significantly contribute to preventing premature wear. Components made from durable materials with excellent strength and wear resistance properties are more likely to withstand the demanding conditions and provide longer service life.
- Avoiding Overloading: Overloading a universal joint beyond its rated capacity can lead to accelerated wear and failure. It is important to operate the joint within its specified load limits and avoid subjecting it to excessive torque or radial loads. Understanding the application requirements and ensuring that the joint is appropriately sized and rated for the intended load is crucial.
By following these preventive measures, it is possible to minimize premature wear in a universal joint, enhance its durability, and prolong its operational life. Regular maintenance, proper lubrication, correct alignment, and adherence to operating guidelines are key to ensuring optimal performance and preventing premature wear in universal joints.

How do you calculate the operating angles of a universal joint?
Calculating the operating angles of a universal joint involves measuring the angular displacement between the input and output shafts. Here’s a detailed explanation:
To calculate the operating angles of a universal joint, you need to measure the angles at which the input and output shafts are misaligned. The operating angles are typically expressed as the angles between the axes of the two shafts.
Here’s a step-by-step process for calculating the operating angles:
- Identify the input shaft and the output shaft of the universal joint.
- Measure and record the angle of the input shaft relative to a reference plane or axis. This can be done using a protractor, angle finder, or other measuring tools. The reference plane is typically a fixed surface or a known axis.
- Measure and record the angle of the output shaft relative to the same reference plane or axis.
- Calculate the operating angles by finding the difference between the input and output shaft angles. Depending on the arrangement of the universal joint, there may be two operating angles: one for the joint at the input side and another for the joint at the output side.
It’s important to note that the specific method of measuring and calculating the operating angles may vary depending on the design and configuration of the universal joint. Some universal joints have built-in methods for measuring the operating angles, such as markings or indicators on the joint itself.
Additionally, it’s crucial to consider the range of acceptable operating angles specified by the manufacturer. Operating a universal joint beyond its recommended angles can lead to increased wear, reduced lifespan, and potential failure.
In summary, calculating the operating angles of a universal joint involves measuring the angular displacement between the input and output shafts. By measuring the angles and finding the difference between them, you can determine the operating angles of the universal joint.

How does a universal joint accommodate misalignment between shafts?
A universal joint, also known as a U-joint, is designed to accommodate misalignment between shafts and allow for the transmission of rotational motion. Let’s explore how a universal joint achieves this:
A universal joint consists of a cross-shaped or H-shaped yoke with bearings at the ends of each arm. The yoke connects the input and output shafts, which are not in line with each other. The design of the universal joint enables it to flex and articulate, allowing for the accommodation of misalignment and changes in angles between the shafts.
When misalignment occurs between the input and output shafts, the universal joint allows for angular displacement. As the input shaft rotates, it causes the yoke to rotate along with it. Due to the perpendicular arrangement of the yoke arms, the output shaft connected to the other arm of the yoke experiences rotary motion at an angle to the input shaft.
The flexibility and articulation of the universal joint come from the bearings at the ends of the yoke arms. These bearings allow for smooth rotation and minimize friction between the yoke and the shafts. They are often enclosed within a housing or cross-shaped cap to provide protection and retain lubrication.
As the input shaft rotates and the yoke moves, the bearings within the universal joint allow for the necessary movement and adjustment. They enable the yoke to accommodate misalignment and changes in angles between the input and output shafts. The bearings allow the yoke to rotate freely and continuously, ensuring that torque can be transmitted smoothly between the shafts despite any misalignment.
By allowing angular displacement and articulation, the universal joint compensates for misalignment and ensures that the rotation of the input shaft is effectively transmitted to the output shaft. This flexibility is particularly important in applications where shafts are not perfectly aligned, such as in automotive drivelines or industrial machinery.
However, it’s important to note that universal joints do have limitations. They introduce a small amount of backlash or play, which can affect precision and accuracy in some applications. Additionally, at extreme angles, the operating angles of the universal joint may become limited, potentially causing increased wear and reducing its lifespan.
In summary, a universal joint accommodates misalignment between shafts by allowing angular displacement and articulation. The bearings within the universal joint enable the yoke to move and adjust, ensuring smooth and continuous rotation between the input and output shafts while compensating for their misalignment.


editor by CX 2024-02-27